Digital Ocean Deployment using an ERC20 Gas Token
This guide documents getting a Scroll SDK deployment working on Digital Ocean’s Kubernetes and managed databases, using Cloudflare for DNS.
Though this isn’t the most “sophisticated” cloud setup, it is a step more complicated than a local devnet.
This guide is intended for chain owners and those that aren’t DevOps professionals, to see what’s involved and show the additional considerations that need to be made.
Because AltGas token introduces another element of complexity, we will use it here as well.
Getting your machine ready
Installing Prerequisites
- kubectl
- helm
- docker
- node ≥ 18
- scroll-sdk-cli (see below)
- doctl (optional)
- k9s (optional)
To install the scroll-sdk-cli, run npm install -g scroll-sdk-cli
Then, run scrollsdk test dependencies to test that the tool works and to check the required dependencies listed above.
Setting up your Owner Wallet
The chain owner has the ability to upgrade essential contracts. We recommend setting up a Safe with at least 2 independently controlled signers required for managing upgrades. You may also consider adding as signers any external party that will help you execute upgrades, as they’ll be able to propose new transactions.
For this demo, I’ll use a temporary development account created in MetaMask.
Setting up your infrastructure
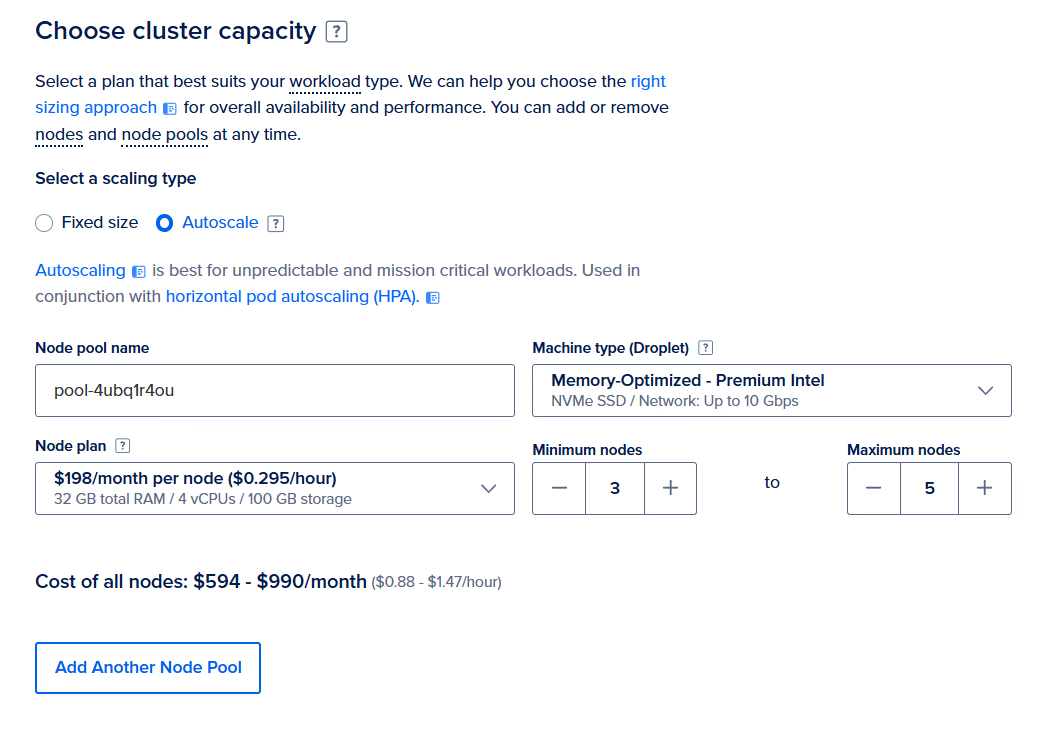
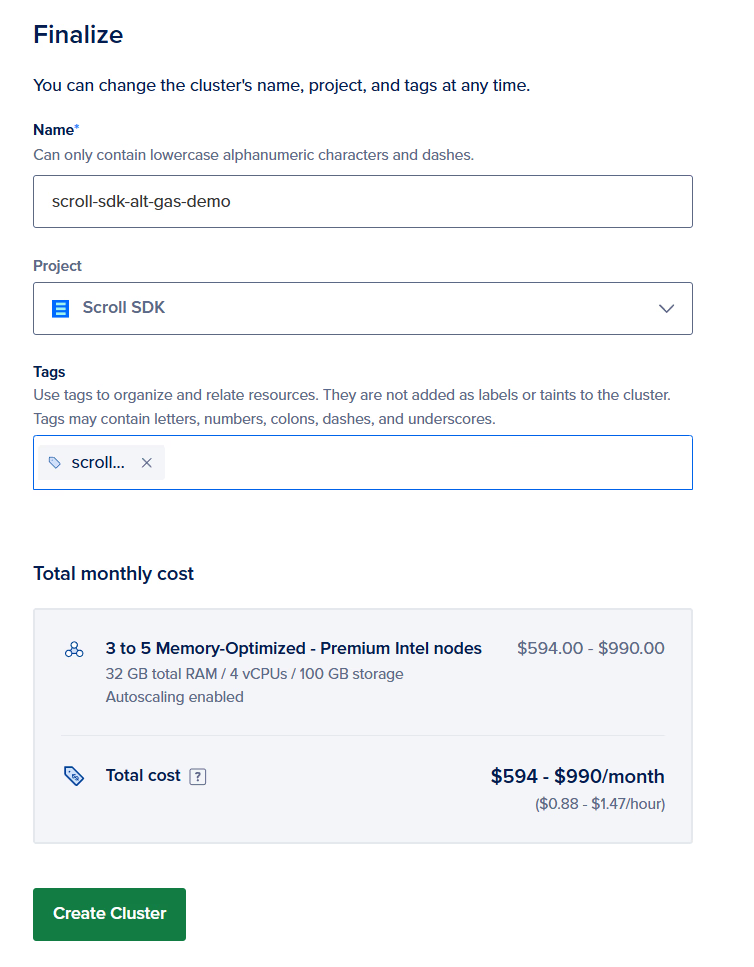
Creating a Kubernetes Cluster
First, we need to setup the cluster of machines that our services will be deployed on.
Here, we will opt for simplicity — you may want to have specific machines better catered to specific services. But, we’ve chosen 10Gbps to handle the heavy testing load and 32GB RAM machines to accommodate the Coordinator, which requires > 20GB.
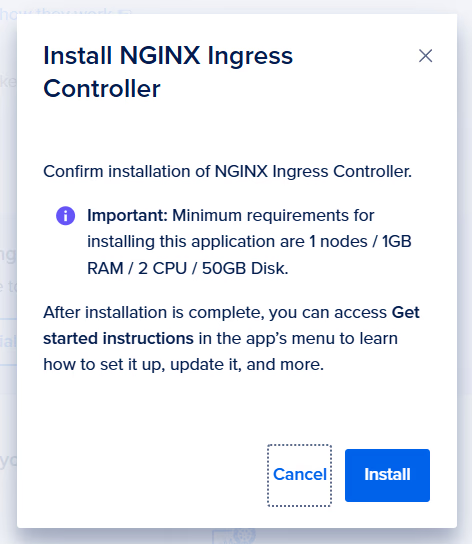
Installing Marketplace Add-Ons
We know we’ll want a Ingress Controller for handling in-bound requests, a monitoring stack and a certificate manager to support HTTPS connections.
All of these can be installed and configured manually, but that falls outside the scope of this guide. Be sure to wait for the new cluster to be fully deployed before trying to install add-ons.
We’ll choose:
- NGINX Ingress Controller
- Kubernetes Monitoring Stack
- Cert-Manager
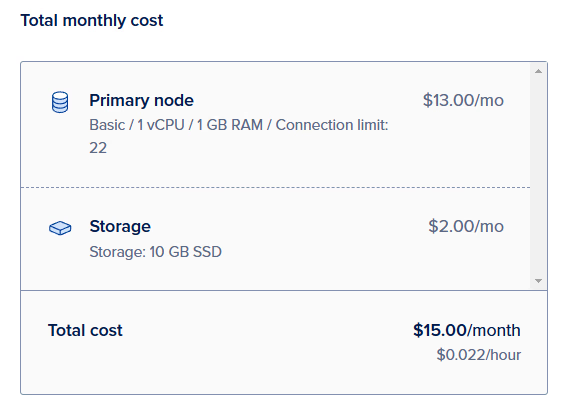
Creating a Managed Database
scroll-sdk uses 3 distinct databases, with 2 additional databases used for L1 and L2 Blockscout instances if needed. We’ll setup a single database cluster that we’ll host each database and user inside (more on the setup later).
Although Digital Ocean supports a Database Service as part of its Kubernetes clusters, we’ll instead just deploy a managed database.
We’ll select the same datacenter as our cluster, PostgresSQL latest version (v16), and start with a Basic - Shared CPU plan. We can always upgrade this configuration easily later on. The default 10GB of storage is okay for now as well.
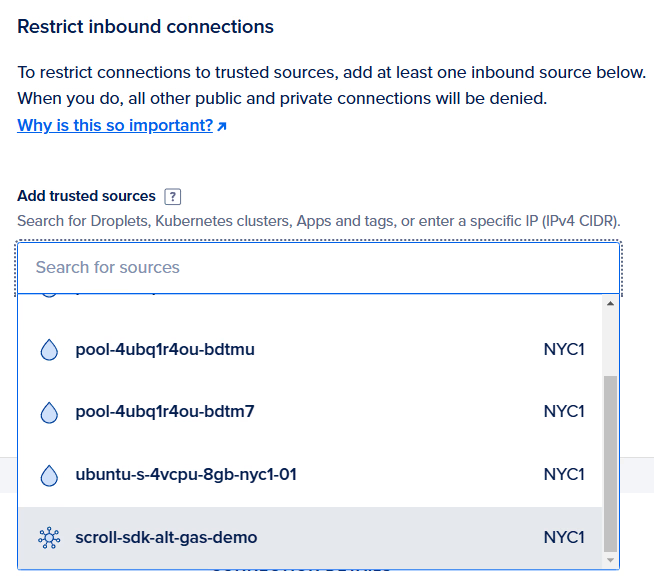
To better secure your database, restrict inbound connections. First, select your new Kubernetes cluster:
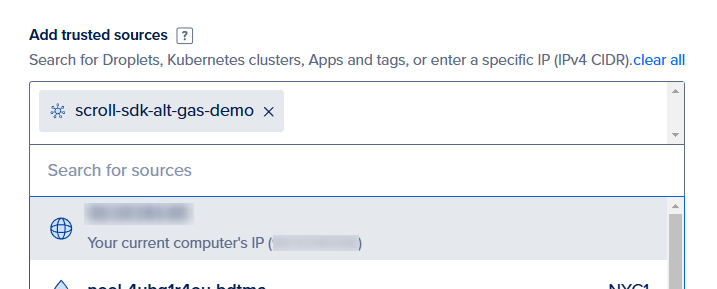
Next, select your current IP so you can run the setup scripts locally later in this guide.
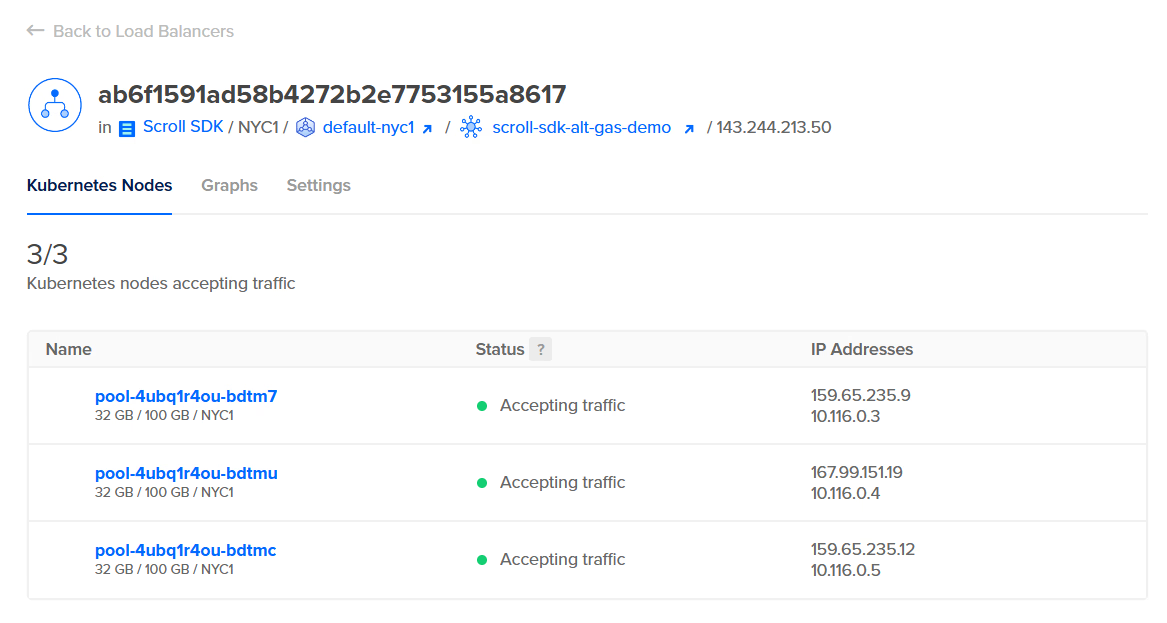
Creating a Load Balancer
DigitalOcean’s NGINX Ingress Controller automatically deploys and configures a load balancer and give it an IP address, viewable in the “Networking” area of your dashboard. We’ll use this IP for setting up DNS.
Configuring your DNS
We’ve already added a domain to be managed by Cloudflare.
Here, we use a subdomain and wildcard to point to our load balancer. Because we don’t have SSL certificates setup and Cloudflare requires additional configuration for wildcards and nested subdomains, we’ll bypass the Proxy. The proxy also has limited support for traffic outside of HTTP & HTTPS traffic.
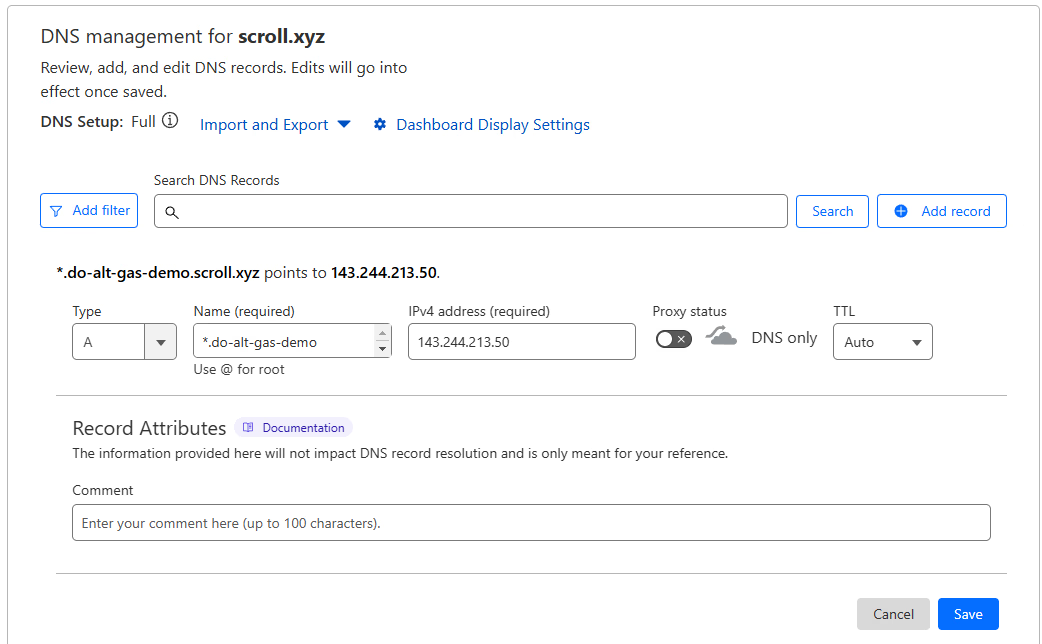
Here, we’ll also make one without the wildcard so that our frontends URL can live at that domain:

Connecting to your Cluster
Next, we need to connect our local machine to the cluster in order to manage it.
DigitalOcean provides two ways of doing this — we’ll use the doctl based version.
Run doctl kubernetes cluster kubeconfig save [credential]
Notice: Adding cluster credentials to kubeconfig file found in "/home/user/.kube/config"Notice: Setting current-context to do-nyc1-scroll-sdk-alt-gas-demo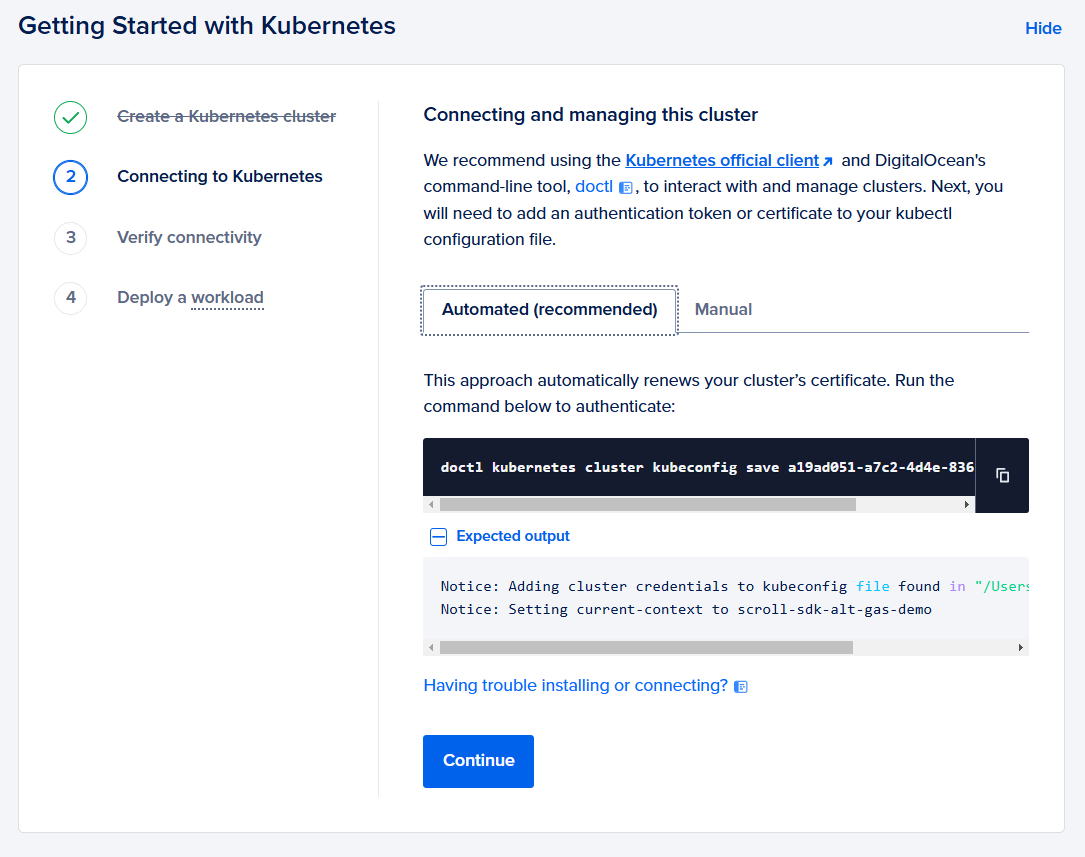
Adding External Secrets Operator
Scroll SDK uses External Secrets to manage sensitive information. Once you have kubctl working with your cluster, please run the following:
helm repo add external-secrets https://charts.external-secrets.iohelm repo updatehelm install external-secrets external-secrets/external-secrets -n external-secrets --create-namespaceSetup your local repo
Let’s now create a directory to host our local files and setup our git repo.
mkdir do-alt-gas-demo && cd do-alt-gas-demo && git initConfiguration
Grabbing Files from scroll-sdk
We’ll want two files from the scroll-sdk repo. You can either copy paste the contents from GitHub, or copy the files from another location you’ve cloned.
Here, I’ll copy them from a local repo copy.
cp ../scroll-sdk/examples/config.toml.example ./config.tomlcp ../scroll-sdk/examples/Makefile.example ./Makefilecp -r ../scroll-sdk/examples/values valuesConfig.toml will be used to setup our base configuration of our chain, from which each service’s independent config files will be generated. Makefile will allow us to directly run helm commands in an automated way. The values directory contains the starter values for each service’s production.yaml file, where we’ll customize the behavior of each chart.
Preparing our Config.toml file
Although these values can be set manually, we have a number of “setup” methods in the scroll-sdk-cli to help you quickly configure your stack.
Setting Domains
We want to setup our ingress hosts and the URLs used by our frontend sites. These will often be the same, but are defined separately to allow flexibility in architecture and usage of HTTP while in development.
If you’re using a public testnet like Scroll Sepolia, please have a private L1 RPC URL ready for HTTPS and WSS. Public RPC endpoints are too unreliable for supporting the SDK backend services.
First, run scrollsdk setup domains to begin an interactive session for setting the values.
Current domain configurations:EXTERNAL_RPC_URI_L1 = "http://l1-devnet.scrollsdk"EXTERNAL_RPC_URI_L2 = "http://l2-rpc.scrollsdk"BRIDGE_API_URI = "http://bridge-history-api.scrollsdk/api"ROLLUPSCAN_API_URI = "http://rollup-explorer-backend.scrollsdk/api"EXTERNAL_EXPLORER_URI_L1 = "http://l1-explorer.scrollsdk"EXTERNAL_EXPLORER_URI_L2 = "http://blockscout.scrollsdk"? Are you using a public L1 network? yes? Select the L1 network: Ethereum Sepolia TestnetUsing sepolia network:L1 Explorer URL: https://sepolia.etherscan.ioL1 RPC URL: https://rpc.ankr.com/eth_sepolia? Do you want to set custom L1 RPC endpoints for the SDK backend? yes? Enter the L1 RPC HTTP endpoint for SDK backend:https://xxxx.quiknode.pro/xxxxx/? Enter the L1 RPC WebSocket endpoint for SDK backend:wss://xxxx.quiknode.pro/xxxxx/? Do you want all L2 external URLs to share a URL ending? yes? Enter the shared URL ending: do-alt-gas-demo.scroll.xyz? Choose the protocol for the shared URLs: HTTPS? Do you want the frontends to be hosted at the root domain? (No will use a "frontends" subdomain) yes
New domain configurations:EXTERNAL_EXPLORER_URI_L1 = "https://sepolia.etherscan.io"EXTERNAL_RPC_URI_L1 = "https://rpc.ankr.com/eth_sepolia"EXTERNAL_RPC_URI_L2 = "https://l2-rpc.do-alt-gas-demo.scroll.xyz"BRIDGE_API_URI = "https://bridge-history-api.do-alt-gas-demo.scroll.xyz/api"ROLLUPSCAN_API_URI = "https://rollup-explorer-backend.do-alt-gas-demo.scroll.xyz/api"EXTERNAL_EXPLORER_URI_L2 = "https://l2-explorer.do-alt-gas-demo.scroll.xyz"
New ingress configurations:FRONTEND_HOST = "do-alt-gas-demo.scroll.xyz"BRIDGE_HISTORY_API_HOST = "bridge-history-api.do-alt-gas-demo.scroll.xyz"ROLLUP_EXPLORER_API_HOST = "rollup-explorer-backend.do-alt-gas-demo.scroll.xyz"COORDINATOR_API_HOST = "coordinator-api.do-alt-gas-demo.scroll.xyz"RPC_GATEWAY_HOST = "l2-rpc.do-alt-gas-demo.scroll.xyz"BLOCKSCOUT_HOST = "blockscout.do-alt-gas-demo.scroll.xyz"? Do you want to update the config.toml file with these new configurations? yesconfig.toml has been updated with the new domain configurations.Initializing our Databases and Database Users
Return to DigitalOcean and get your admin connection information:
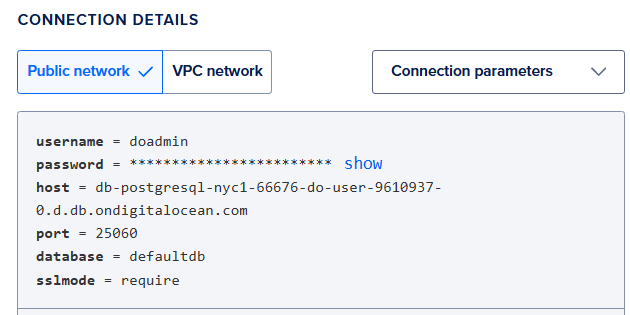
Run scrollsdk setup db-init, select “yes” to Blockexplorer, “no” to L1 Explorer, then enter the public network host value from DigitalOcean, followed by the port, admin username and password, and default database.
Now, input the information from the VPC Network panel, which is how pods will connect to the database from inside the virtual private network.

Next, follow the prompts to create the new database users and passwords.
When prompted “Do you want to connect to a different database cluster for this database?”, type “no”.
Lastly, when asked “Do you want to update the config.toml file with the new DSNs?” select “yes” to update your config.
Dealing with Connections & Connection Pools
DigitalOcean limits the number of incoming connections and we’ll quickly reach this limitation for the basic cluster we’ve deployed. We’ll setup “Connection Pools” so that services can leave their connections open, but share the “bandwidth” of number of active db transactions.
In the DigitalOcean “Connection Pool” tab, create the following pools and choose their corresponding database, using “Transaction” Pool Mode. Pool size can be 4 for each.
In the end, your Connection Pools page should look like this:
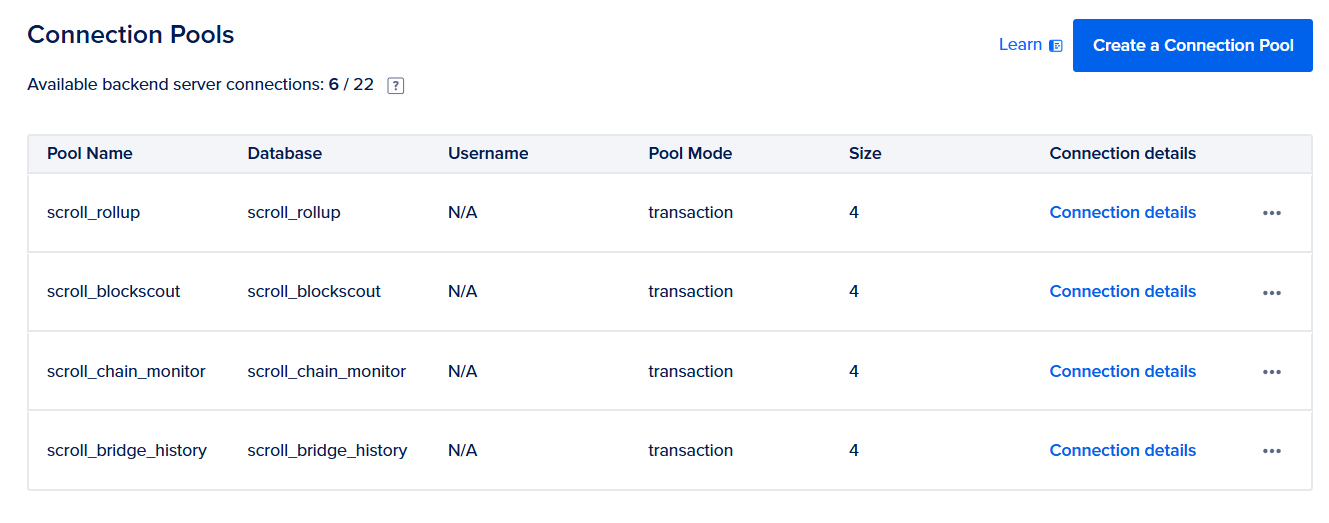
Notice, these pool names use a different port to connect, so we need to modify config.toml to use this port number (for me, 25061), or, if you altered the pool name, use it instead of the database name in the DSN string.
You can do this manually or run scrollsdk setup db-init --update-port 25061
Generate Keystore Files
Next, we need to generate new private keys for the sequencer signer and the SDK accounts used for on-chain activity. The prompt will also ask if you want to setup backup sequencers. These will be standby fullnodes ready to take over the sequencer role if needed for recovery or key rotation. This step will also allow you to setup pre-defined bootnodes.
This step will also update L2_GETH_STATIC_PEERS to point to all sequencer as well.
Follow the prompt by running scrollsdk setup gen-keystore. Use the Owner wallet address of the multi-sig generated in the first step, or for testing, allow the script to generate a wallet for you. But, be sure to save the private key, as it should not be stored in config.toml!
Define Gas Token Details
If no token address specified, a new ERC20 will be deployed on L1. The Example decimal is only used for this deployed contract.
Below configuration uses Aave DAI, see their faucet here.
[gas-token]ALTERNATIVE_GAS_TOKEN_ENABLED = trueL1_GAS_TOKEN = "0xFF34B3d4Aee8ddCd6F9AFFFB6Fe49bD371b8a357"You can follow the prompt by running scrollsdk setup gas-token
Generate Configuration Files
Now, we’ll do the last steps for generating each service’s configuration files based on our values in config.toml.
Run scrollsdk setup configs.
You’ll see a few prompts to update a few remaining values, like the L1 height at contract deployment and the “deployment salt” which should be unique per new deployment with a deployer address.
Now, we’ll simulate contract deployment to get contract addresses and build the config files and secrets files for all SDK services. Secrets will be written to ./secrets and config files to ./values. If you want the config files written to a different directory, pass the --configs-dir flag.
Pull Charts and Move Config Files
Now, we need to prepare the Helm charts. We will check access to charts, review the Makefile and check the values files for any missing values.
To do this, run scrollsdk setup prep-charts
After pulling the charts, the CLI tool will try to auto-fill each chart’s production.yaml file.
You will be prompted with each update, and even flagged for empty values. Be sure to sanity check these values to make sure you didn’t setup something incorrectly earlier. If you did, re-run any earlier steps, being sure to rerun the setup configs command before running setup prep-charts .
Push Secrets
Lastly, we need to take the configuration values that are sensitive and publish them to wherever we’re deploying “secrets.”
Since DigitalOcean doesn’t natively host a Secret Management tool like AWS or Azure, we’ll use Hashicorp Vault to store our sensitive data like database connection strings and private keys.
For the purposes of this demo, we will not host an independent version of Hashicorp vault, but instead launch a service in our cluster, and push values to this vault. Then, items from the store are made available to pods using External Secrets.
First, let’s setup a local development setup of Hashicorp Vault.
helm repo add hashicorp https://helm.releases.hashicorp.comhelm repo updatehelm install vault hashicorp/vault --set "server.dev.enabled=true"Next, we’ll create a secret to store our access token and a SecretStore — copy paste the following text to vault-secret-store.yaml
apiVersion: external-secrets.io/v1beta1kind: SecretStoremetadata: name: vault-backendspec: provider: vault: server: "http://vault.default.svc.cluster.local:8200" path: "scroll" version: "v2" auth: tokenSecretRef: name: vault-token key: token---apiVersion: v1kind: Secretmetadata: name: vault-tokentype: OpaquestringData: token: "root" # This is the default token in dev mode. Don't use in production!Now, run kubectl apply -f ./vault-secret-store.yaml
Next, run scrollsdk setup push-secrets and select “Hashicorp Vault - Dev”. If you need guidance with another Secret Provider, please reach out.
You’ll be asked to update your production.yaml files, and we’ll be ready to deploy!
Enable TLS & HTTPS
Next, we’ll want to enable HTTPS access. You should have already enabled Cert Manager through the DigitalOcean backend.
Now, save the following file as cluster-issuer.yaml (being sure to use your own email address) then run kubectl apply -f cluster-issuer.yaml
apiVersion: cert-manager.io/v1kind: ClusterIssuermetadata: name: letsencrypt-prodspec: acme: server: https://acme-v02.api.letsencrypt.org/directory email: replace.this@email.com privateKeySecretRef: name: letsencrypt-prod solvers: - http01: ingress: class: nginxNext, run scrollsdk setup tls and walk through the instructions to update each of your production.yaml files that define an external hostname.
Deploying
Fund the Deployer
We need to send some Sepolia ETH to the Deployer — 2 ETH should do it. Run the following if you want to use your mobile wallet or have forgotten the account.
scrollsdk helper fund-accounts -i -f 2
-i is used for funding the deployer. Later we’ll run this with different params to fund other SDK accounts.
Now, let’s fund the other L1 accounts.
scrollsdk helper fund-accounts -f 0.2 -l 1
Here, we pass -l 1 to only fund the L1 accounts. Any L2 funding will fail at this point since we haven’t launched the chain yet!
Installing the Helm Charts
Run make install to install (or later, to upgrade) all the SDK charts needed. It may help to run the commands one-by-one the first time, and check the deployment status. k9s is a useful tool for this. The sample Make file also doesn’t include Blockscout, but feel free to add it as well.
Fund L2 accounts
Let’s fund our L1 Gas Oracle Sender (an account on L2 😅) with some funds.
scrollsdk helper fund-accounts -f 0.2 -l 2 will fund it with 0.2 of our gas token. Select “Directly fund L2 Wallet” for now, since our Deployer starts with 1 token starts with 1 token on L2. But now we have a working chain, so we can start bridging funds!
Testing
scroll-sdk-cli has a number of tools built in for testing your new network. These commands should be run from the same directory as your config.toml and config-contracts.toml files.
Ingress
Run scrollsdk test ingress to check all ingresses and that they match the expected value. If you’re not using the default namespace, add -n [namespace].
Contracts
Run scrollsdk test contracts to check all contract deployments, initialization and owner updates.
e2e Test
Run scrollsdk test e2e to try end-to-end testing. Without any flags, the test with create and fund a new wallet, but depending on Sepolia gas costs, you may need to manually fund the generated account with additional ETH. If the tests stop at any time, just run scrollsdk test e2e -r to resume from the saved file.
We recommend opening up another terminal and running scrollsdk helper activity -i 1 to generate traffic and produce more blocks — otherwise, finalization will be stopped.
Frontends
Go visit the frontends, connect your wallet and try to bridge some funds!
Next Steps
Disable L1 Data Fee
On Scroll, transactions on L2 have two components — the gas costs for execution and an L1 data fee. When gas on your network is paid in a token that has no standard relationship to the currency being used to pay for data fees on the L1, you will need to introduce tooling that can set the gas caluclation “scalar” values.
At the moment, we have not built any automated tooling for this, and instead of viewing the ERC20 value as 1:1 with Sepolia Ether, we suggest setting the scalars to 0 to eliminate these overheads.
To do so, you can run the following commands using your L2 RPC URL and Owner account private key:
cast send --rpc-url http://l2-rpc.scrollsdk 0x5300000000000000000000000000000000000002 "setCommitScalar(uint256)" 0 --private-key [private-key]cast send --rpc-url http://l2-rpc.scrollsdk 0x5300000000000000000000000000000000000002 "setBlobScalar(uint256)" 0 --private-key [private-key]Or, if your Owner is just a test account, you can use it’s private key to call this method:
scrollsdk helper set-scalars -k [private-key]Deploy Blockscout
As long as you setup the databases in the scrollsdk setup db-init step, you can download the chart, extract it, and run helm upgrade -i blockscout blockscout --values blockscout/values/production.yaml
Optimize Machine Configuration with Node Affinity
As you work with your network, you might want to be more selective about the pools you provide to services.
One example is that the l2-sequencer may want additional CPU-resources and the coordinator-api has RAM requirements far greater than other services.
If you’d like to give this a try, create a new “Node Pool” in DigitalOcean — perhaps selecting “CPU Intensive - 8vCPU 16 GB RAM” and naming it “pool-sequencer”.
Now, in your values/l2-sequencer-production-0.yaml file, add the following section:
affinity: nodeAffinity: requiredDuringSchedulingIgnoredDuringExecution: nodeSelectorTerms: - matchExpressions: - key: doks.digitalocean.com/node-pool operator: In values: - pool-sequencerresources: requests: memory: "450Mi" cpu: "80m" limits: memory: "14Gi" cpu: "7.5"Here, we’re adding asking it to only select nodes that are in the “pool-sequencer” and increasing the resources of the pod to allow up to 7.5 CPU cores.
To apply this, run:
helm upgrade -i l2-sequencer-0 oci://ghcr.io/scroll-tech/scroll-sdk/helm/l2-sequencer \ --version=0.0.11 \ --values values/l2-sequencer-production-0.yamlReplace with the version value from your Makefile. Add -n [namespace] if you’re not using the default namespace.
For more info, see the Kubernetes page on Assigning Pods to Nodes.
Add Redundancy with Replicas
Soon, we’ll add more information about quickly adding Replicas.
For some components (like l2-rpc and all -api services), this is as easy as adding or modifying the following value in your production.yaml file:
controller: replicas: 2Some services do not support this without additional configurations (for example, l2-sequencer and l2-bootnode). We are working on additional info on how to properly run multiple services for loadbalancing between or for having redunant backups available.
Enable Proof Generation using External Providers
The Scroll team has been collaborating closely with teams specializing in proof generation to enable plug-and-play proof generation for SDK networks.
In this example, we’ll use a sample chart from the scroll-proving-sdk repo to generate proofs with Sindri. In the future, teams will publish their own charts for chains to easily enable one or external providers.
Because this feature is not directly built into the Scroll SDK, there will be quite a bit of copy-pasting.
Creating Values Files for each type of Provider
In Scroll, we have 3 types of provers: chunk (type-1), batch (type-2), and bundle (type-3). We’ll deploy 3 sets of the chart, each with a different type of prover.
Create the following files in your values directory:
prover-chunk-production.yaml:
global:  nameOverride: &app_name prover-chunk  fullnameOverride: *app_name
persistence:  config:    enabled: true    type: configMap    mountPath: /sdk_prover/    name: prover-chunk-config
scrollConfig: | { "prover_name_prefix": "sindri_chunk_", "keys_dir": "keys", "coordinator": { "base_url": "http://coordinator-api:80", "retry_count": 3, "retry_wait_time_sec": 5, "connection_timeout_sec": 60 }, "l2geth": { "endpoint": "http://l2-rpc:8545" }, "prover": { "circuit_type": 1, "circuit_version": "v0.13.1", "n_workers": 1, "cloud": { "base_url": "https://sindri.app/api/v1/", "api_key": "<your-api-key>", "retry_count": 3, "retry_wait_time_sec": 5, "connection_timeout_sec": 60 } } }prover-batch-production.yaml:
global:  nameOverride: &app_name prover-batch  fullnameOverride: *app_name
persistence:  config:    enabled: true    type: configMap    mountPath: /sdk_prover/    name: prover-batch-config
scrollConfig: | { "prover_name_prefix": "sindri_batch_", "keys_dir": "keys", "coordinator": { "base_url": "http://coordinator-api:80", "retry_count": 3, "retry_wait_time_sec": 5, "connection_timeout_sec": 60 }, "l2geth": { "endpoint": "http://l2-rpc:8545" }, "prover": { "circuit_type": 2, "circuit_version": "v0.13.1", "n_workers": 1, "cloud": { "base_url": "https://sindri.app/api/v1/", "api_key": "<your-api-key>", "retry_count": 3, "retry_wait_time_sec": 5, "connection_timeout_sec": 60 } } }prover-bundle-production.yaml:
global:  nameOverride: &app_name prover-bundle  fullnameOverride: *app_name
persistence:  config:    enabled: true    type: configMap    mountPath: /sdk_prover/    name: prover-bundle-config
scrollConfig: | { "prover_name_prefix": "sindri_bundle_", "keys_dir": "keys", "coordinator": { "base_url": "http://coordinator-api:80", "retry_count": 3, "retry_wait_time_sec": 5, "connection_timeout_sec": 60 }, "l2geth": { "endpoint": "http://l2-rpc:8545" }, "prover": { "circuit_type": 3, "circuit_version": "v0.13.1", "n_workers": 1, "cloud": { "base_url": "https://sindri.app/api/v1/", "api_key": "<your-api-key>", "retry_count": 3, "retry_wait_time_sec": 5, "connection_timeout_sec": 60 } } }Be sure to set prover.api_key to the value created in Sindri’s user dashboard.
Notice that each file is similar, with only the prover.circuit_type and few name values changing.
Lastly, set prover.n_workers to the number of provers you’d like to dedicate to proof generation. We recommend starting at 1 for each during testing, but scaling up as needed.
Adding Provers to your Makefile
Now, let’s add the prover services to the bottom of your Makefile.
install-provers:  helm upgrade -i prover-chunk oci://ghcr.io/scroll-tech/scroll-sdk/helm/scroll-proving-sdk -n $(NAMESPACE) \    --version=0.0.5 \    --values values/prover-chunk-production.yaml
  helm upgrade -i prover-batch oci://ghcr.io/scroll-tech/scroll-sdk/helm/scroll-proving-sdk -n $(NAMESPACE) \    --version=0.0.5 \    --values values/prover-batch-production.yaml
  helm upgrade -i prover-bundle oci://ghcr.io/scroll-tech/scroll-sdk/helm/scroll-proving-sdk -n $(NAMESPACE) \    --version=0.0.5 \    --values values/prover-bundle-production.yaml
delete-provers:  helm delete -n $(NAMESPACE) prover-chunk  helm delete -n $(NAMESPACE) prover-batch  helm delete -n $(NAMESPACE) prover-bundle
Now, simply run make install-provers to deploy the provers.
Monitoring
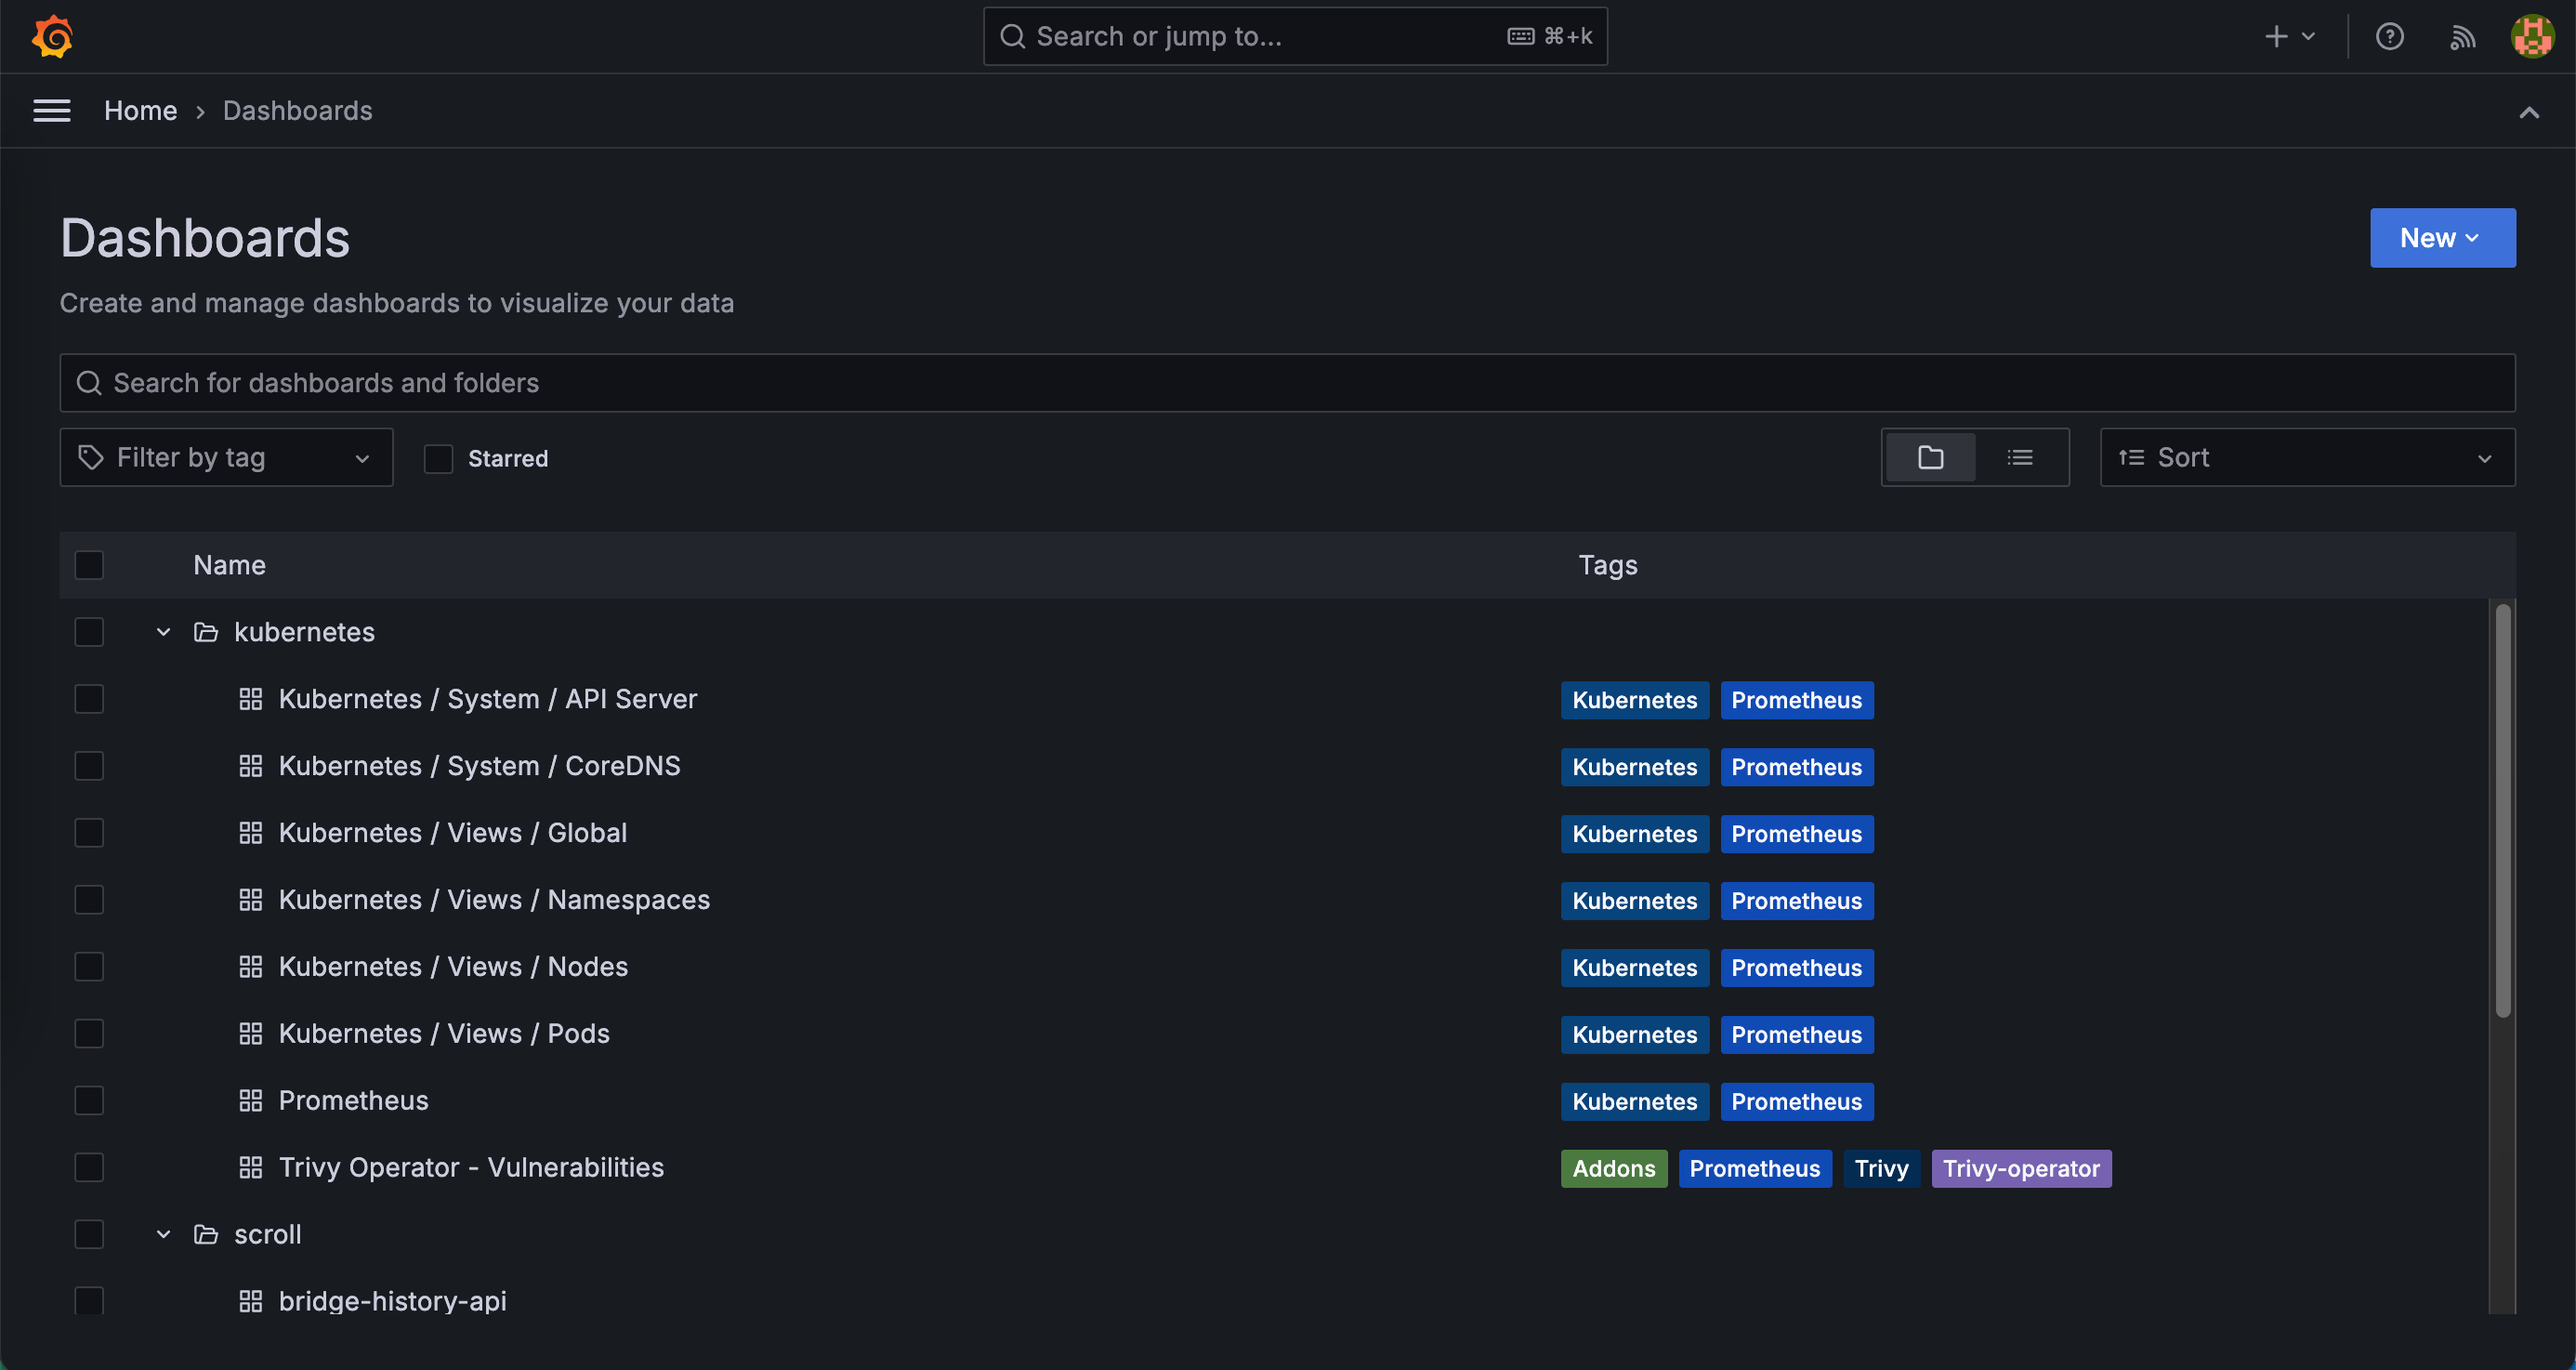
You can monitor the cluster’s running status through Grafana.
Additionally, you can send alerts via email and Slack using Alertmanager.
If you have configured a domain for Grafana in the previous steps, you can access it by opening http://grafana.yourdomain, where you will see two sets of dashboards. The defalt password of user admin is scroll-sdk.
send alert to slack
-
Create a Slack App
Open https://api.slack.com/apps and click
Create New Appif you don’t have one already. SelectFrom scratch, enter a name, and select the workspace. -
Activate Incoming Webhooks
Click the
Incoming Webhookslabel on the right side of the page, then turn onActivate Incoming Webhooks.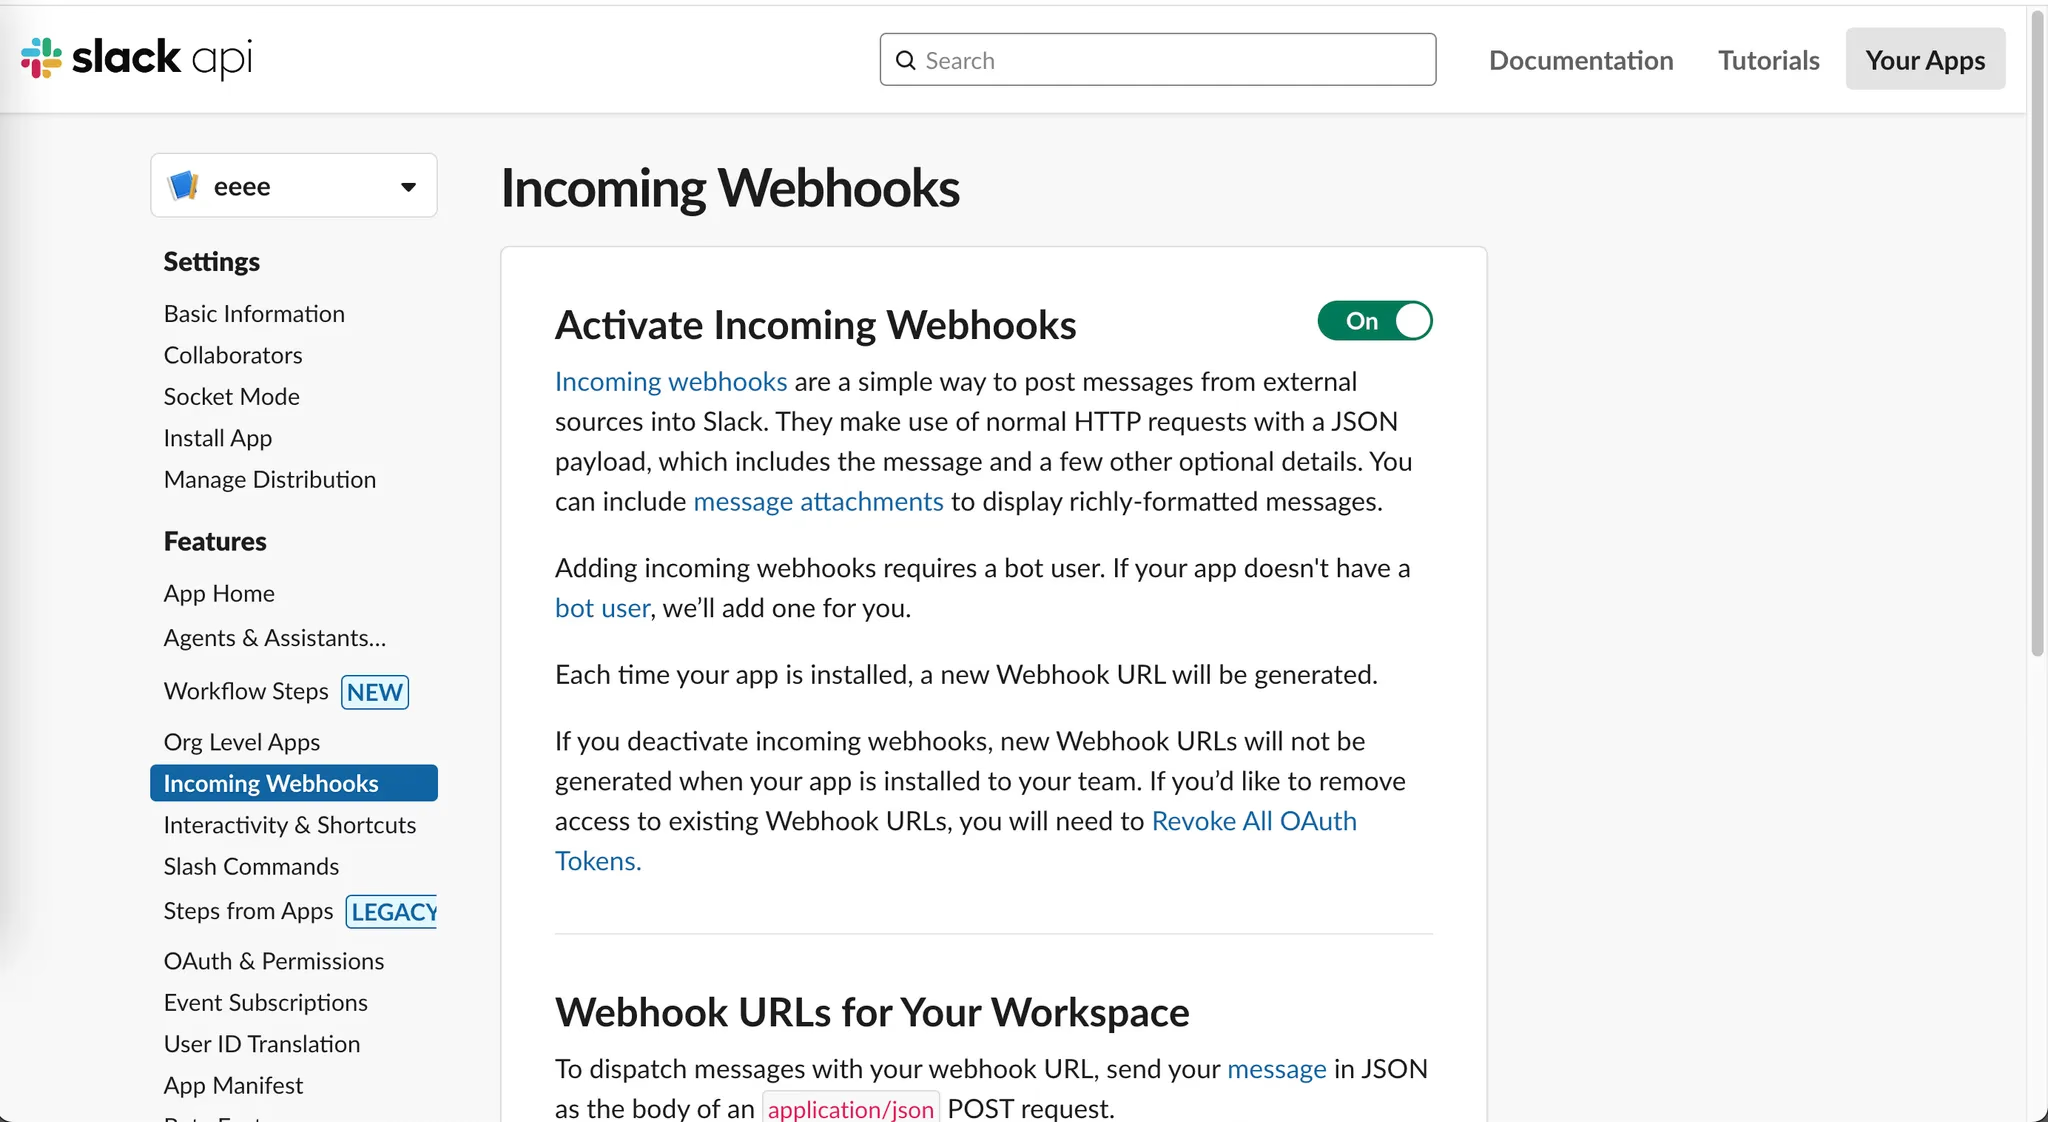
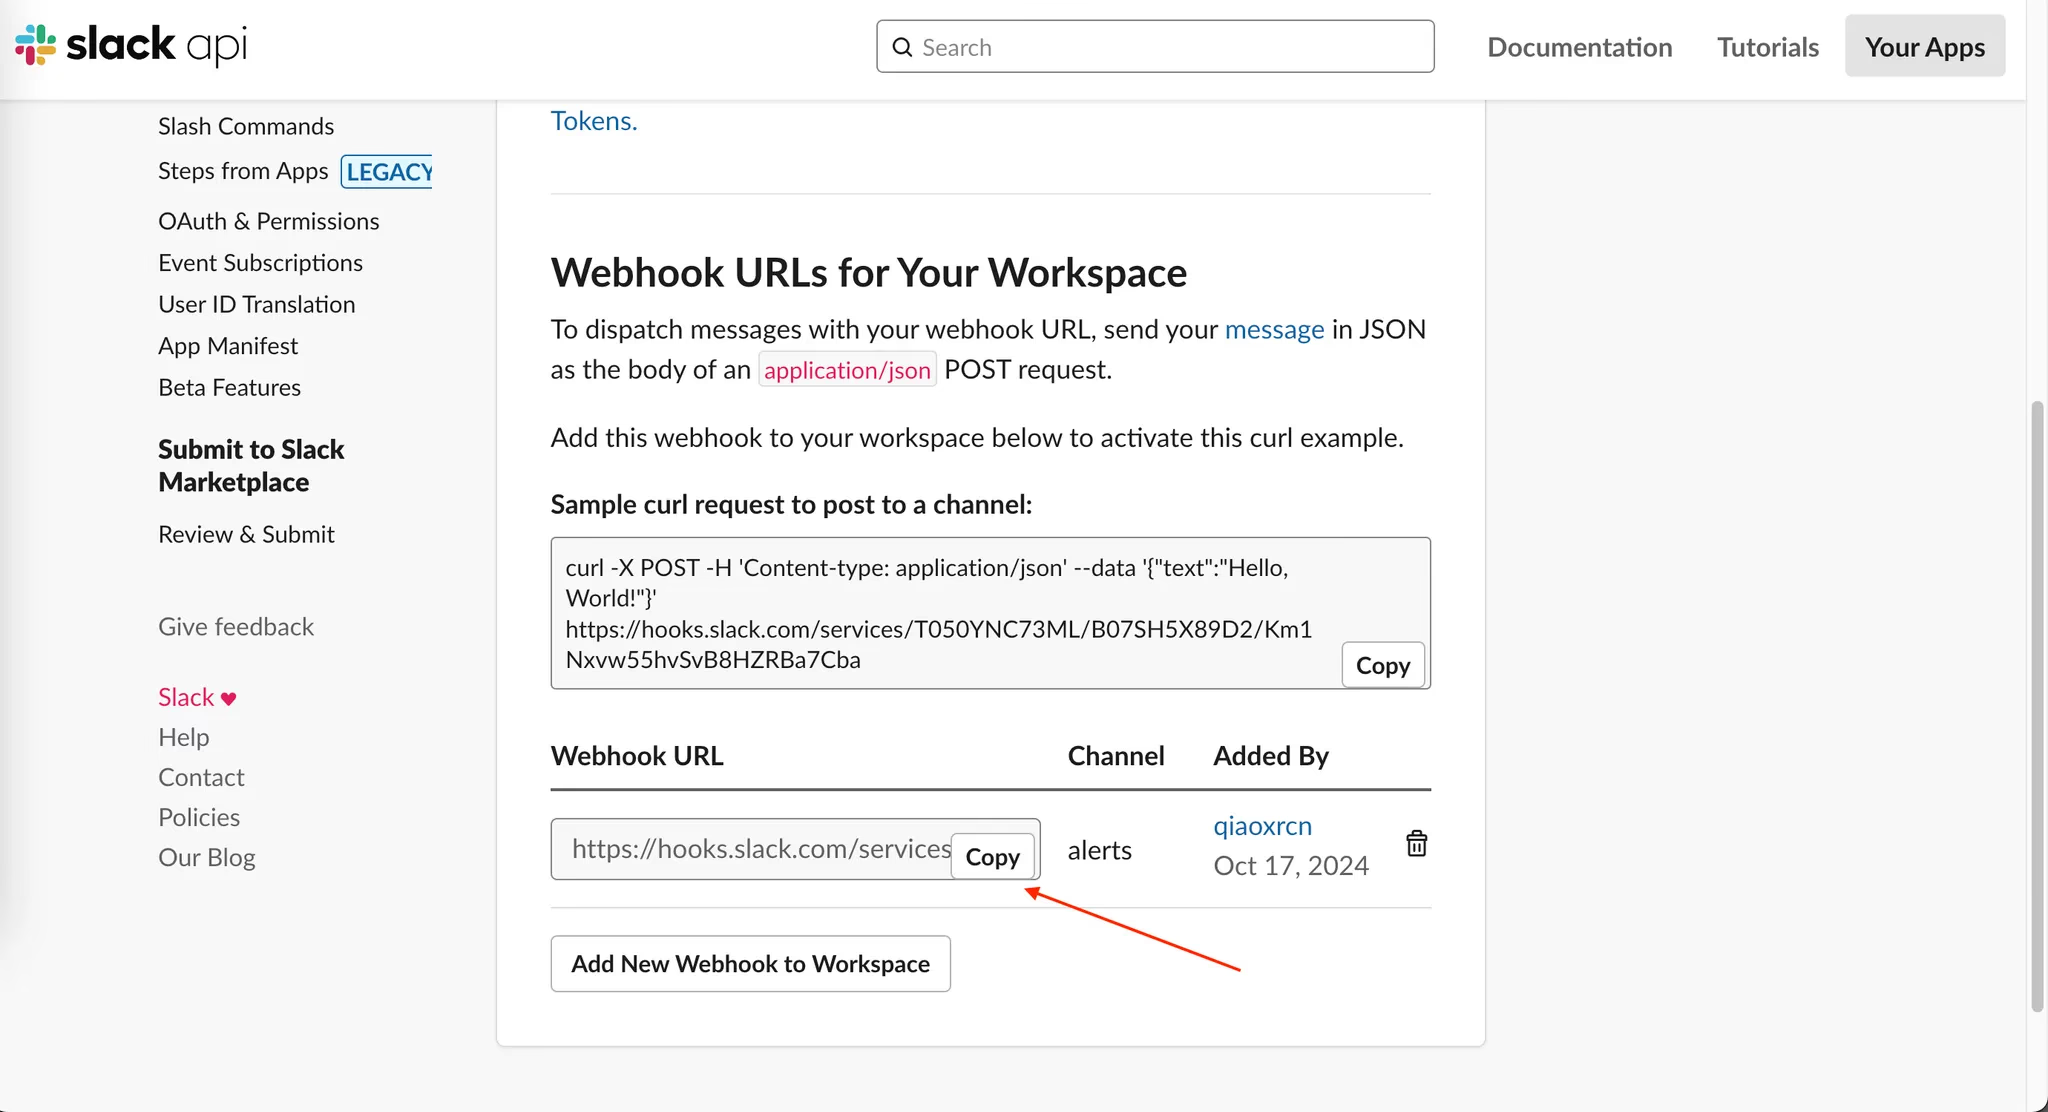
Click the
Add New Webhook to Workspacebutton.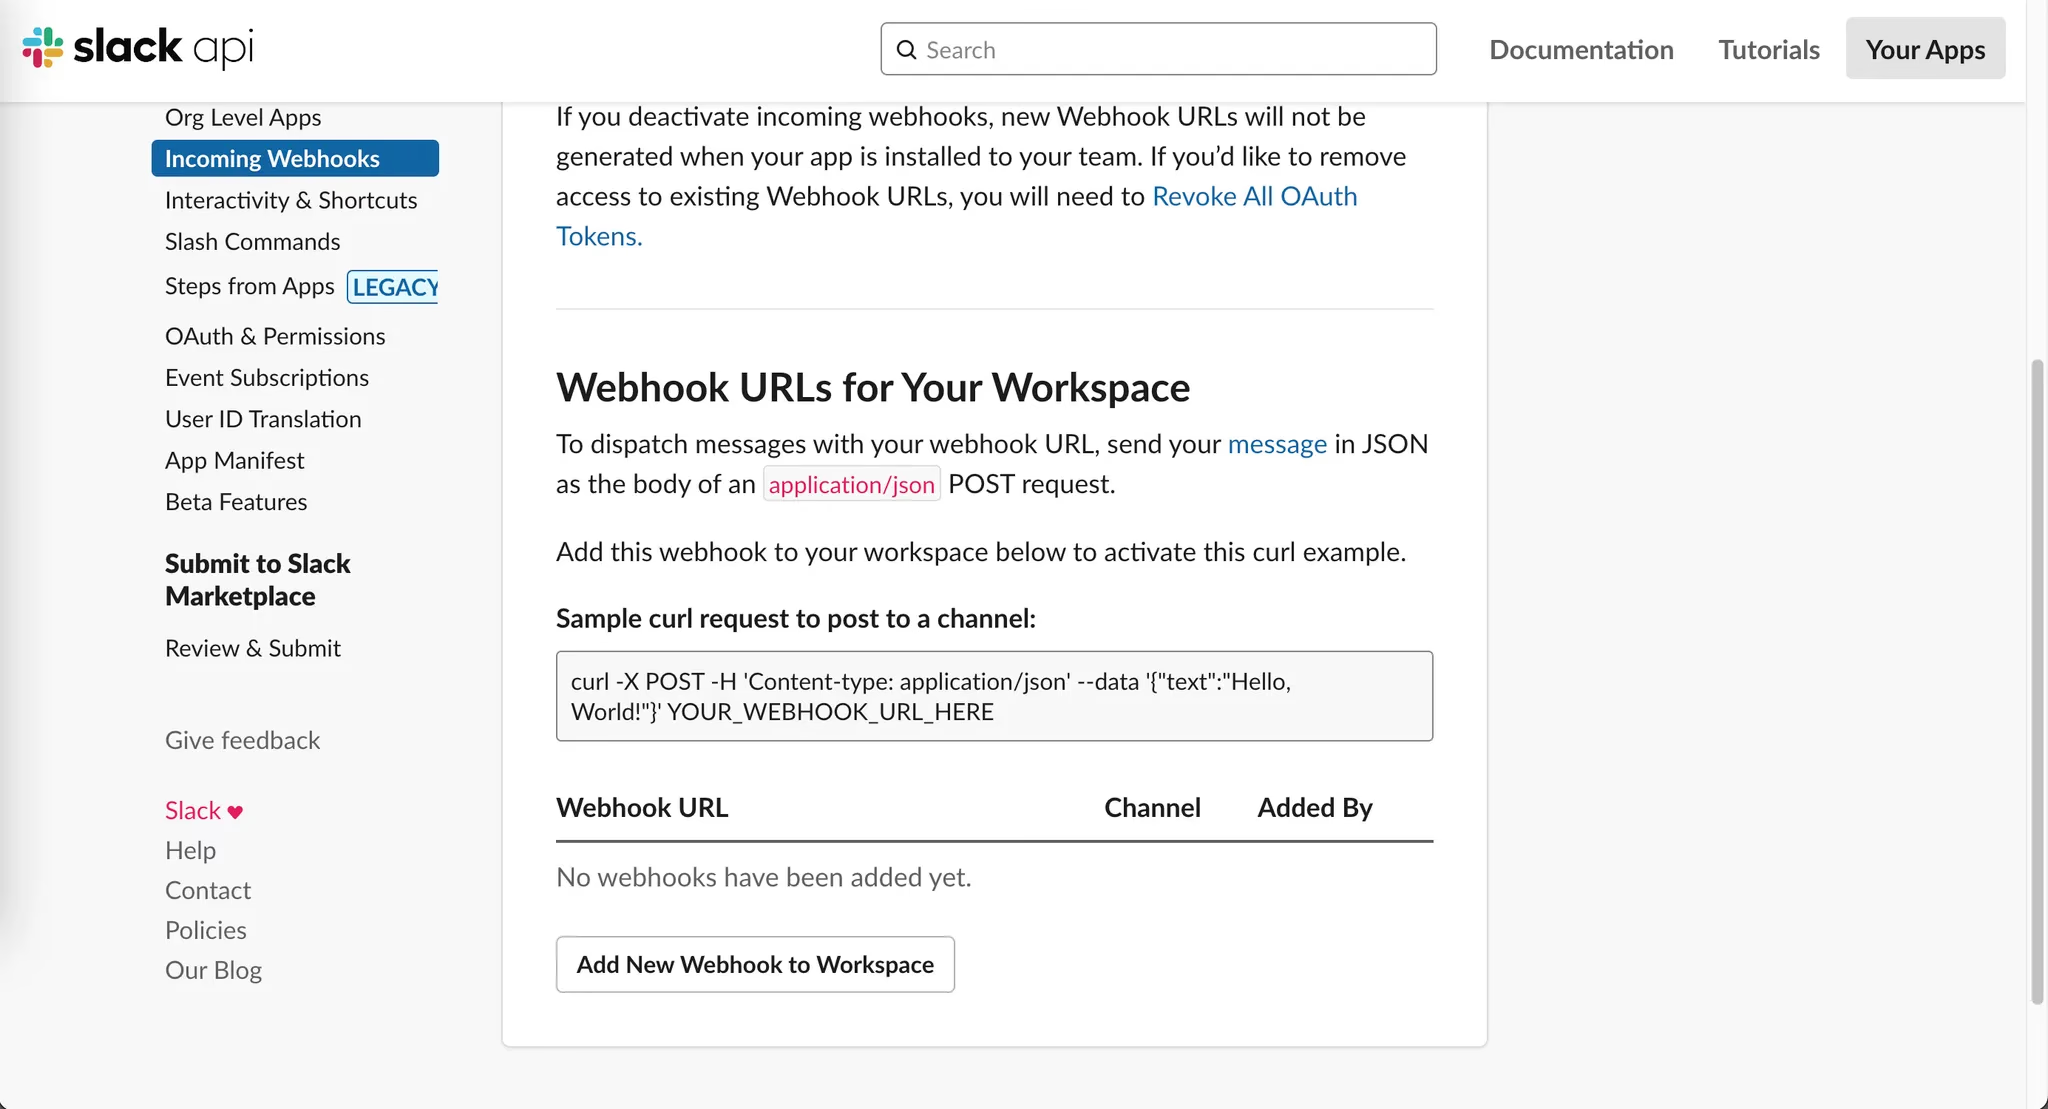
Select the channel you want to send alerts to, then copy the Webhook URL.
-
Edit the Config File
Edit
./values/alert-manager.yamlto replace it with your webhook URL and your Slack channel name.kube-prometheus-stack:alertmanager:config:global:resolve_timeout: 5mslack_api_url: 'https://hooks.slack.com/services/xxxxxxxxxxx/xxxxxxxxxxx/xxxxxxxxxxxxxxxxxxxxxxxx' # your webhook urlreceivers:- name: 'slack-alerts'slack_configs:- channel: '#scroll-webhook' #your channel namesend_resolved: truetext: '{{ .CommonAnnotations.description }}'title: '{{ .CommonAnnotations.summary }}'route:group_by: ['alertname']receiver: 'slack-alerts'routes:- matchers: []receiver: 'slack-alerts'This configuration file will send all alerts to your Slack channel. If you need more complex rules, refer to the Prometheus Alerting Configuration Documentation.
-
Update to alertmanager
Use the following command to update Alertmanager:
helm upgrade --reuse-values -i scroll-monitor oci://ghcr.io/scroll-tech/scroll-sdk/helm/scroll-monitor -n $(NAMESPACE) \--values ./values/alert-manager.yaml
