Developer Quickstart
With Scroll, your favorite tools for building and testing smart contracts just work.
Since Scroll is bytecode equivalent with the EVM, you’ll just need to point your favorite builder tools at a Scroll RPC Provider.
If you run into any issues, please reach out in our Discord.
Acquiring Ether
Scroll uses ETH as its native currency, which will be needed to pay transaction fees for deploying and interacting with the network.
To start building on Scroll, we suggest you begin with using our Scroll Sepolia testnet. You’ll first need to acquire some testnet ETH. See the Faucet page for tips on getting test tokens on Sepolia. After this, you can bridge your testnet ETH to the Scroll Sepolia Testnet (Layer 2) using our Sepolia Bridge, as described in the Bridge article.
For a walkthrough, start with the User Guide’s Setup page.
Once you’re ready to deploy on Scroll’s mainnet, you can bridge over ETH using our native bridge or one of the 3rd-party bridges.
Network Configuration
Scroll Mainnet
Use the table below to configure your Ethereum tools to the Scroll mainnet.
| Network Name | Scroll | Ethereum Mainnet |
|---|---|---|
| RPC URL | https://rpc.scroll.io/ | https://eth.llamarpc.com |
| Chain ID | 534352 | 1 |
| Currency Symbol | ETH | ETH |
| Block Explorer URL | https://scrollscan.com/ | https://etherscan.io |
Additional Scroll Mainnet RPCs and Infra
Scroll Sepolia Testnet
Use the table below to configure your Ethereum tools to the Scroll Sepolia Testnet.
| Network Name | Scroll Sepolia | Ethereum Sepolia |
|---|---|---|
| RPC URL | https://sepolia-rpc.scroll.io/ | https://rpc2.sepolia.org |
| Chain ID | 534351 | 11155111 |
| Currency Symbol | ETH | ETH |
| Block Explorer URL | https://sepolia.scrollscan.com | https://sepolia.etherscan.io |
Additional Scroll Sepolia RPCs and Infra
Configure your tooling
Hardhat
Modify your Hardhat config file hardhat.config.ts to point at the Scroll Sepolia Testnet public RPC.
...
const config: HardhatUserConfig = {  ...  networks: {    scrollSepolia: {      url: "https://sepolia-rpc.scroll.io/" || "",      accounts:        process.env.PRIVATE_KEY !== undefined ? [process.env.PRIVATE_KEY] : [],    },  },};
...
Foundry
To deploy using the Scroll Sepolia Testnet Public RPC, run:
forge create ... --rpc-url=https://sepolia-rpc.scroll.io/Remix Web IDE
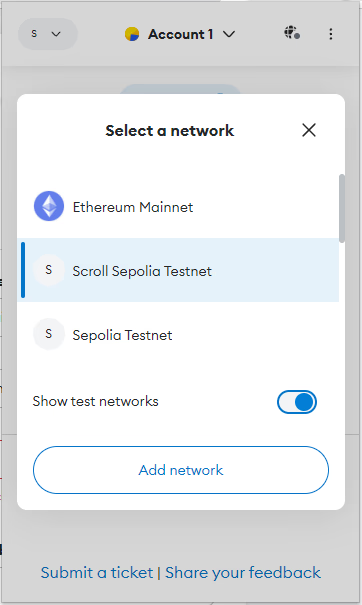
After compiling your contracts, the easiest way to deploy using Remix is by setting up Metamask, then selecting the Scroll Sepolia Testnet network.

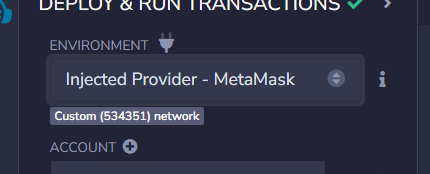
Now, in the “Deploy and Run Transactions” tab, use the “Environment” drop-down and select “Injected Provider - MetaMask.”

Connect your wallet and select the Scroll Sepolia Testnet. Your account should be selected automatically in Remix, and you can click “Deploy.”
Truffle
Assuming you already have a Truffle environment setup, go to the Truffle configuration file, truffle.js. Make sure to have installed HDWalletProvider: npm install @truffle/hdwallet-provider@1.4.0
const HDWalletProvider = require("@truffle/hdwallet-provider")...module.exports = { networks: { scrollSepolia: { provider: () => new HDWalletProvider(process.env.PRIVATE_KEY, "https://sepolia-rpc.scroll.io/"), network_id: '*', }, }}Brownie
To add the Scroll Sepolia Testnet, run the following command:
brownie networks add Ethereum scrollSepolia host=https://sepolia-rpc.scroll.io/ chainid=534351To set this as your default network, add the following in your project config file:
networks: default: scrollSepoliaAnother way to add the Scroll Sepolia Testnet is to create a yaml file and run a command to add it.
This is an example of a yaml file called network-config.yaml
live:- name: Ethereum networks: - chainid: 534351 explorer: https://sepolia.scrollscan.com/ host: https://sepolia-rpc.scroll.io id: scrollSepolia name: Scroll Sepolia TestnetTo add the Scroll Sepolia Testnet to the network list, run the following command:
brownie networks import ./network-config.yamlTo deploy on Scroll, run the following command. In this example, token.py is the script to deploy the smart contract. Replace this with the name of your script:
brownie run token.py --network scrollSepoliaethers.js
Setting up a Scroll Sepolia Testnet provider in an ethers script:
import { ethers } from "ethers"
const provider = new ethers.providers.JsonRpcProvider("https://sepolia-rpc.scroll.io/")
scaffold-eth
To deploy using Scaffold-eth, you’ll need to point both your Hardhat and React settings at the Scroll Sepolia Testnet.
Configure Hardhat
In the packages/hardhat/hardhat.config.js file, you’ll add the network and select it as the default network.
...//// Select the network you want to deploy to here://const defaultNetwork = "scrollSepolia";...module.exports = {... networks: {... scrollSepolia: { url: "https://sepolia-rpc.scroll.io/", accounts: { mnemonic: mnemonic(), }, }, }...}Be sure to fund the deployment wallet as well! Run yarn generate to create the wallet and yarn account to check its funds. Once funded, run yarn deploy --network scrollSepolia to deploy on the Scroll Sepolia testnet.
Configure the Frontend
To configure your frontend, you need to add the Scroll Sepolia Testnet as a network option, then select it as default.
To add the network, modify packages/react-app/src/constants.js.
...export const NETWORKS = {... scrollSepolia: { name: "scrollSepolia", color: "#e9d0b8", chainId: 534351, rpcUrl: "https://sepolia-rpc.scroll.io/", blockExplorer: "https://sepolia.scrollscan.com", },...}Next, in packages/react-app/src/App.jsx modify
.../// 📡 What chain are your contracts deployed to?const initialNetwork = NETWORKS.scrollSepolia;...